> For the complete documentation index, see [llms.txt](https://docs.appmachine.com/llms.txt). Markdown versions of documentation pages are available by appending `.md` to page URLs; this page is available as [Markdown](https://docs.appmachine.com/share-your-app/apple-app-store/new-app-record-in-app-store-connect.md).
# New app record in App Store Connect
This article explains how to create a new app record in the App Store Connect portal. After following the steps in this article, you'll be able to select the app record during the publishing process. In that sense, the app that you're creating through these steps is the 'shell' in which your AppMachine app will be 'nested'.
This article describes one of the steps you have to take to get your app published in the Apple App Store. [Click here to see all of the steps.](/share-your-app/apple-app-store.md)
**Preparation**
During the technical setup of your app, AppMachine will have created an App Bundle Identifier for your app because you clicked the **Create New App Bundle Identifier**.
### Create your app
1. If everything went according to plan, you are reading this article because you clicked in the wizard below on the button **Create your App in the App App Store Connect portal**.
2. Login with your Apple developer account on ..
3. Once logged in, open the **My Apps** section.\
\
\&#xNAN;*\* If you're a member of multiple developer teams, then make sure that you've switched to the correct developer team via the account menu in the top-right corner of the screen.*\
\

4. On the **My Apps** page, click the blue **+ button** and select the option '**New App**' to create your new app.\
\

5. The 'New App' modal will be displayed in which you'll have to specify information about your app. Below we'll go through all of the requested information in order to explain what Apple is asking, and which value(s) you will have to enter or select.\
\
| **Item** | **Description** | **Choose** |
| -------------------- | ------------------------------------------------------------------------------------------------------------------------------------------------------------------------------------------------------------------------------------------------------------------------------------------------------------ | --------------------------------------------------------------------------------------------------------------------------------------------------------------------- |
| **Platform** | This option allows you to specify the platform(s) for which your app will be made available.
AppMachine apps only offer support for the iOS platform. Selecting any additional platform will cause our system to be unable to publish your app to the App Store.
| **Only select Platform iOS** |
| **Name** | This will be the name of your app as it will be displayed in the App Store.
Please note that app names in the App Store have to be unique, and are limited to a maximum of 30 characters.
|
|
| **Primary Language** | This concerns the main language of your app, and will also determine the App Store in which your app will be published primarily.
Although this language setting does not determine the availability of your app, it can determine whether the app name of your choosing is available for use.
|
|
| **Bundle ID** | This is the unique technical identifier of your app which was created during the previous step of the publishing process.
Open the list and select the value that matches the bundle identifier that you've chosen for your app in AppMachine.
| **Select the value that matches the bundle identifier. you can find the right one in the AppMachine page in the grey box shown at the top of this article (Step 1).** |
| **SKU** | A second unique identifier for your app. This identifier is not visible in the App Store. | **Fill with the last part of your bundle identifier: e.g. com.app.a1234ab** |
| **User Access** | This option allows you to limit which users within your developer team will be able to view this app in App Store Connect.
| **Set this to 'Full Access'.** |
\
\
When you've provided all the information, the form should look something like the image below.\

6. Click **Create** to finish creating your App Store Connect app record. This screen may take some time to process. If the process seems stuck, we advise you to **refresh** the browser manually. You should see something like this:\
\
\
\
**After creating the app you will be re-directed to the versions page of your app. All the information on this page will be filled out automatically by AppMachine.** \
\
**However, there is some information for your app that AppMachine is not able or not allowed to fill out on your behalf. Please continue following the steps below to get your app ready for publication through AppMachine.**
7. From the left-side menu, open the **Pricing and Availability page**. On this page you will be able to select a price tier for your app, as well as specify the countries or regions in which your app will become available once published. \
We recommend that you choose:\
\* If you don't plan to sell your app in the Apple App Store, choose **0,00 (Free).**\
\&#xNAN;**\*** Choose "**all countries or regions selected"**\
Use the **Save** button in the top-right corner of the screen to save your changes.\
\

8. From the left-side menu, open the **App Privacy page.**\
On this page you will have to specify your app's data collection practices. We as AppMachine are not allowed to do this for you, but this process contains quite some technical terms. To assist you with the process of entering your app's App Privacy details we've created a separate help center article with a step-by-step guide on how and what to enter: [App privacy details on the App Store](/share-your-app/apple-app-store/app-privacy-details.md) **and start at Step B**\
\
\&#xNAN;***Please follow the steps in the aforementioned help center article concerning the App Privacy details of your app.***
9. Go back to AppMachine and click **Continue** in the screenshot below.\
\
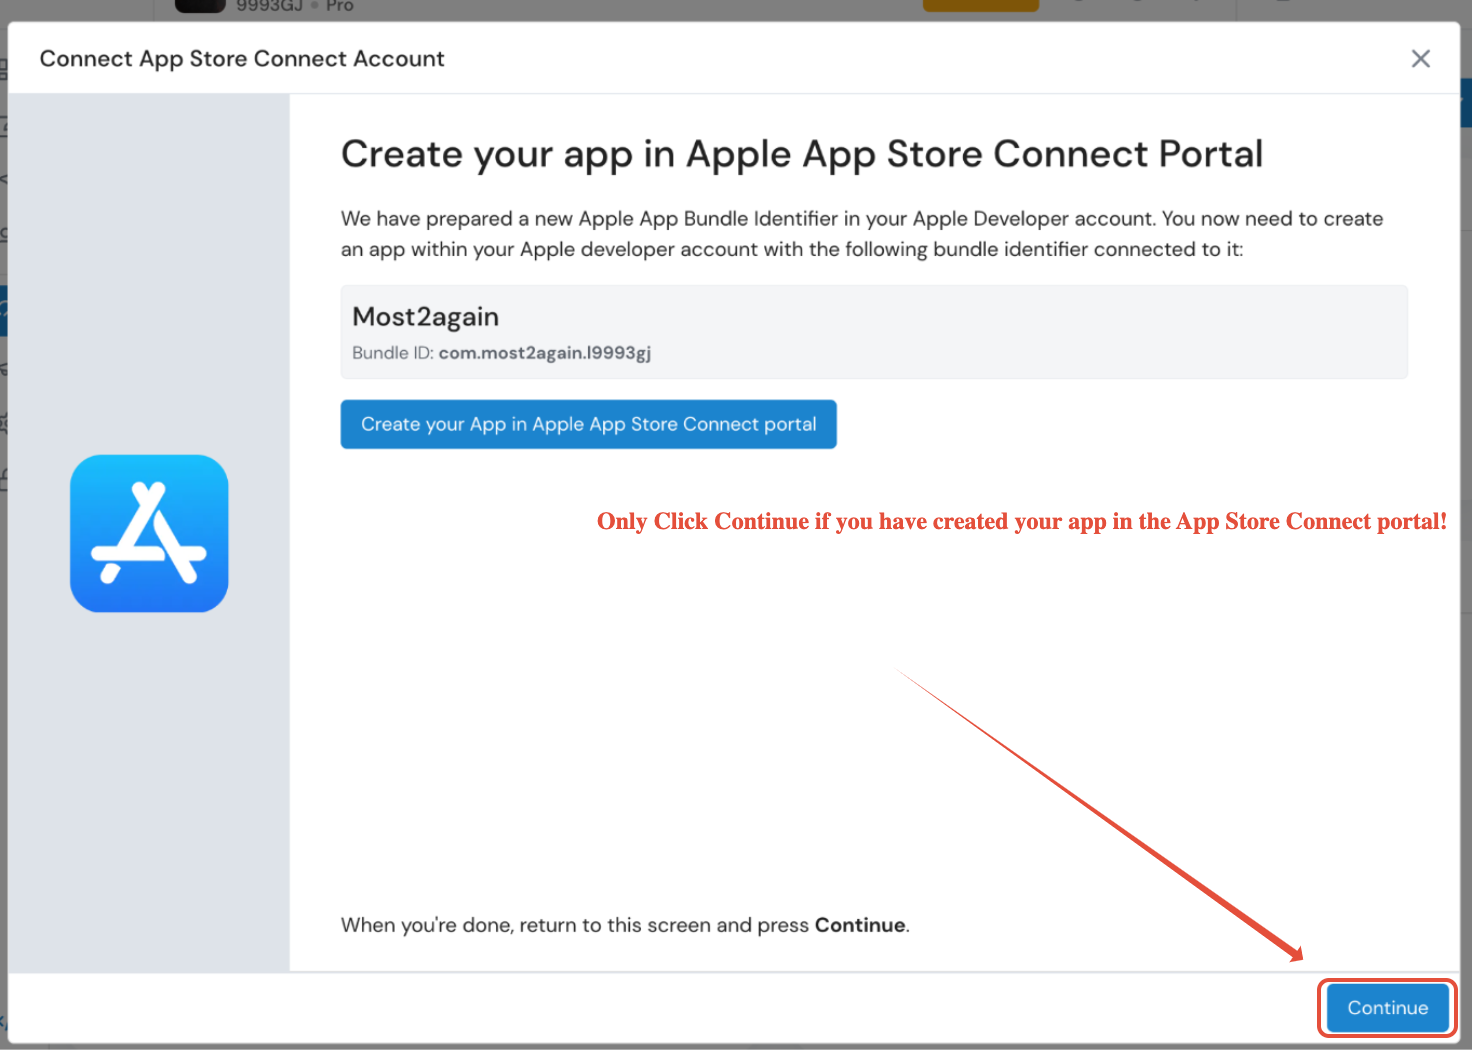\
\* If this wizard has been closed in the meantime, you can click **Setup App Store Connect API key** in the Publish dashboard again\
\
\
In that case you need to enter some information again following [these guidelines](/share-your-app/apple-app-store/app-store-connect-api-keys.md) \
and then choose the app you just created.
10. Select the created app in the wizard and click **Continue**